Build an Automated Content Quality Gate to Catch Blog Errors
 •
December 15, 2025
•
December 15, 2025

Key takeaways
- Automated content guardrails help you scale content creation without sacrificing quality or brand consistency.
- Integrating tools like Markup AI, Zapier, and WordPress allows you to create a proactive quality gate that works behind the scenes.
- This system empowers your team to move faster and safer, catching errors before they become embarrassing problems.
The need for automated content quality gates
There are few things more embarrassing than finding a glaring error in a blog post that’s already been published. It’s even worse when a customer, a prospect, or your boss finds it first. A simple terminology mistake, a broken sentence, or a deviation from our brand voice can undermine the trust we work so hard to build. You need an automated content quality gate.
At my company, we publish a lot of content, and we have several different authors contributing. Like many teams, our workflow for final reviews isn’t always followed to the letter. Manual checks are a bottleneck, and things inevitably slip through the cracks.
So, what if I told you there was a way to automatically get an email telling you about quality, consistency, and other issues the moment a post goes live? A way to fix problems before they’re ever discovered?
I built exactly that. Using Markup AI, Zapier, and WordPress, I created a system that checks our published posts so we can catch any issues before anyone else does.
My secret weapon: An automated content guardrail
I needed a way to enforce our content standards without slowing everyone down. The goal wasn’t to block publication but to create a safety net — a quality gate that flags issues for a quick fix.
Here’s how my automated workflow operates:
- A post is published in WordPress. The process kicks off the second any author hits “Publish.”
- Zapier sends the post to Markup AI. The entire post is automatically sent to Markup AI’s Content Guardian Agents℠.
- Markup AI does its magic. Our guardian agents instantly scan the content for issues, score it against our specific brand and style rules, and rewrite any problematic sections.
- I get an email. An email with a full quality report lands in my inbox, giving me a complete overview of the new post.
Everything I need from one email
This automated email is my dashboard for content quality. When a post is published, I get a notification that tells me everything I need to know.
Here’s what’s inside:
- The basics: The post’s title and author, with a direct link to the live article.
- A quality score: I get an at-a-glance overview of the post’s quality, with individualized scores for everything we care about — clarity, terminology, brand voice, and style. I immediately see where it’s failing and where it’s succeeding.
- Detailed stats: The report includes the total number of issues found, giving me a clear sense of the edits required.
- The instant rewrite: This is the best part. Markup AI provides a rewritten version of the content with all the suggested fixes already implemented. I can just copy and paste the improved text directly back into WordPress to resolve every issue.
With this system, I get a full download on every asset, regardless of who published it. We can send these alerts to any blog admin, so we all know if a published post needs a quick touch-up. We can fix it before a prospect, a customer, or my boss finds it, and everyone can be happy about the content we publish.
Set it up yourself in minutes
You can build this exact workflow. It’s pretty easy and straightforward to set up.
- Copy my Zapier template. You can duplicate everything I’ve built by using our pre-made template. There’s a link below to get started.
- Connect your accounts. Link the template to your WordPress blog.
- Sign up for Markup AI. You can connect this workflow to a free Markup AI account by signing up for one of our trials.
- Connect your email. We use Gmail to send the email to the people who need to know when there’s an issue on the blog.
How to setup the Zap
Step 1: Add a step and select the “WordPress” app. Set the Event to “New Post.” Under the configure step, choose the status “Published” and the Post Type to “Posts”
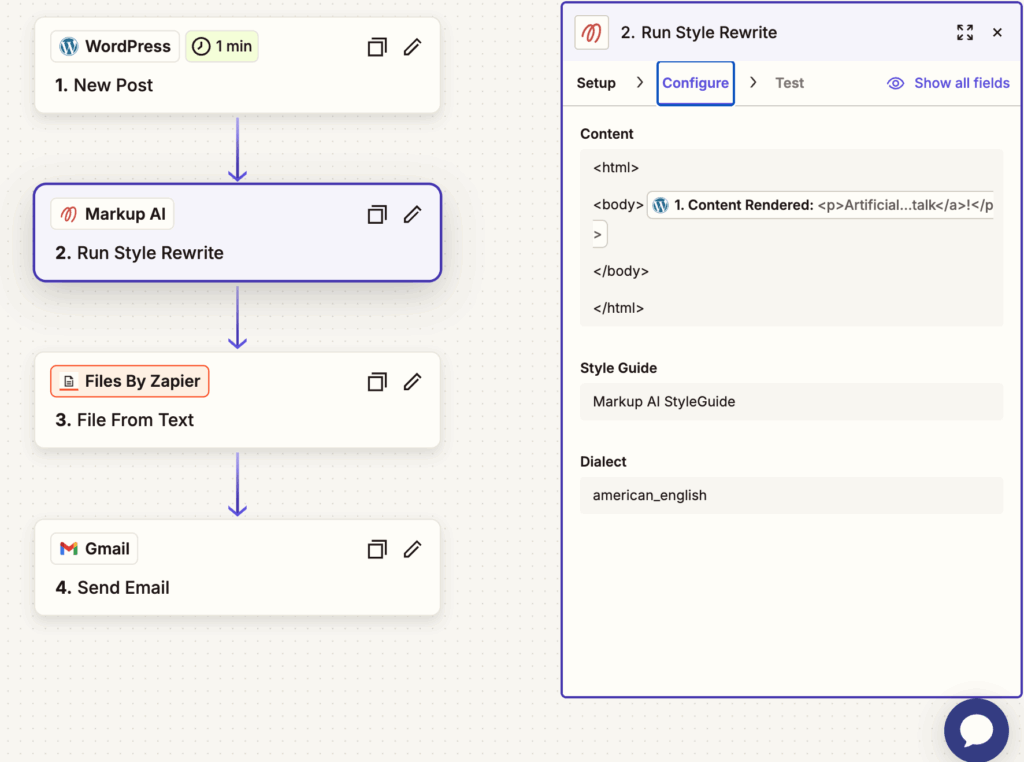
Step 2: Add a new step and add the “Markup AI” app. Under Setup/Event, choose “Run Style Rewrite.” And under Configure in the Content area, add opening and closing HTML and Body tags. And in between the body tag, insert a dynamic content field for “WordPress Content Rendered.” This will add the blog post to the request sent to Markup AI for checking.
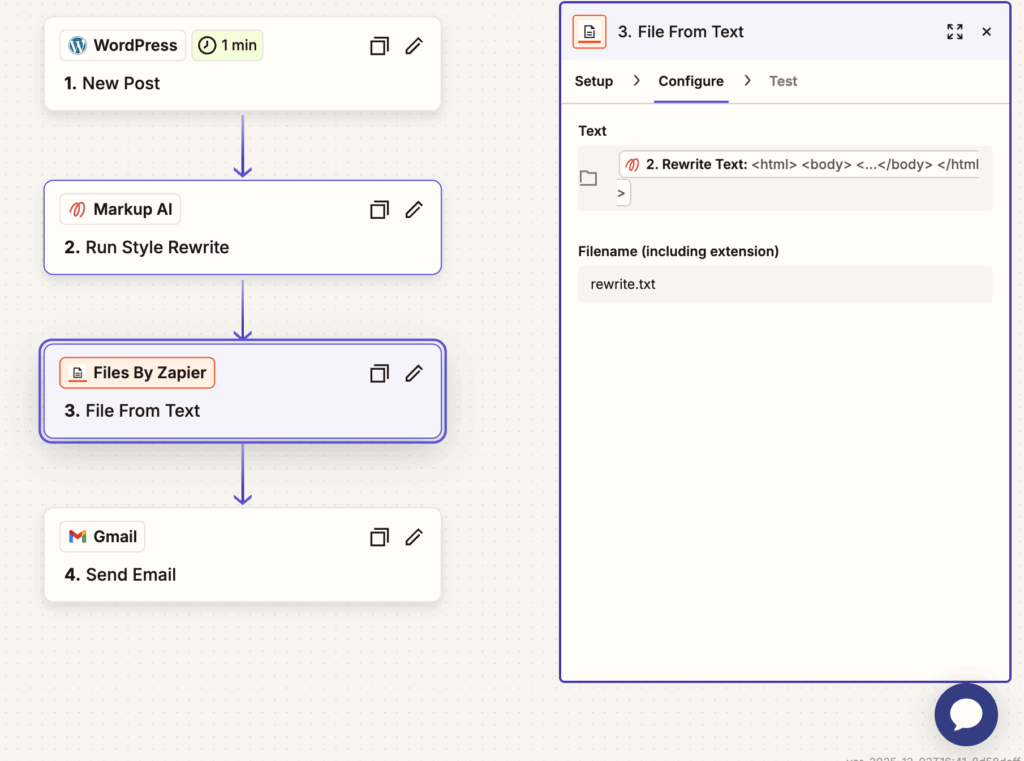
Step 3: Add a new step and use the “Files By Zapier” app. Under Setup choose the Action Event “File From Text.” Then under Configure, insert a dynamic content field for “Rewrite Text” from Markup AI. Add a filename such as “rewrite.txt.
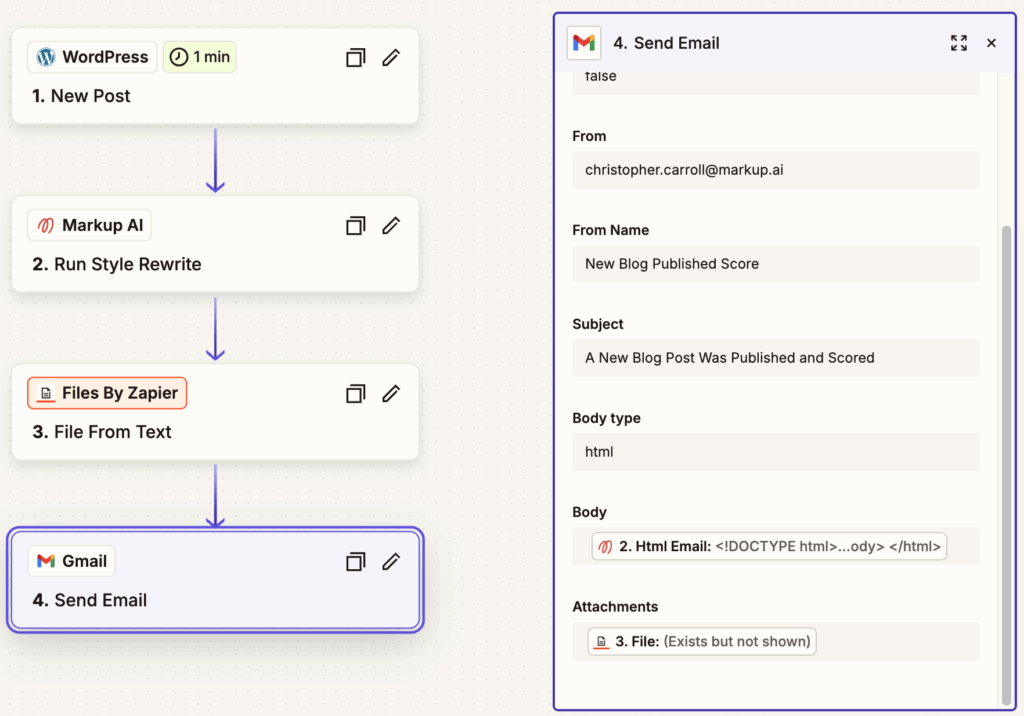
Step 4. Add a new step and use your preferred email provider. In this example we used “Gmail.” Set the Action Event to “Send Email.” Then complete the fields for “from, from name, subject, body type =HTML. Then under the body area, add the dynamic field of the Markup AI “HTML Email.” Under Attachments, add a dynamic field for the “Files By Zapier” and choose “File” to add the rewrite as an attachment to the email.
Go ahead and start connecting. You’ll have an automated content quality gate up and running in no time.
[Copy the Zapier Template Here]
[Start Your Free Markup AI Trial Here]
Frequently Asked Questions (FAQs)
What do I need to set this workflow up?
You’ll need an account with Zapier, a WordPress website, and a Markup AI account. You can get started with a free Markup AI trial.
Is it difficult to configure?
Not at all. The easiest way is to use our shared Zapier template, which has the entire workflow pre-built. You’ll just need to connect your accounts.
Can I customize the quality rules Markup AI checks for?
Yes. You have full control inside Markup AI to define your own rules for brand voice, terminology, style, and compliance. The Content Guardian Agents will score and rewrite content based on your unique standards.
Last updated: December 15, 2025
Christopher Carroll
Continue reading

The Revenue Impact of Brand Voice Consistency
 •
February 27, 2026
•
February 27, 2026
Markup AI Expands Board to Scale Trusted AI Content Governance

Build a Scalable Content Taxonomy for Technical Documentation
•
February 24, 2026
Get early access. Join other early adopters
Deploy your Brand Guardian Agent in minutes.